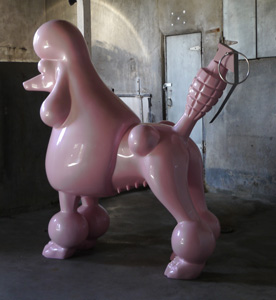
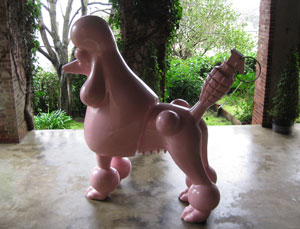
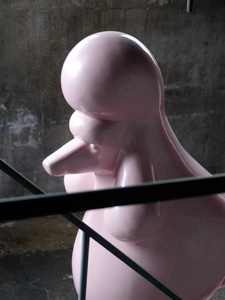
NOBODY'S POODLE
A MOLD and TWO CASTS
This is the diary I kept while making a mold and two casts of the sculpture Nobody's
Poodle from the original sculpture.
It is a record of the process and materials and was not
meant for publication. However, after finishing the project, I realized the
journal might inform
the layman of the difficulties and time-consuming processes involved making
a mold of this size and castings from it.
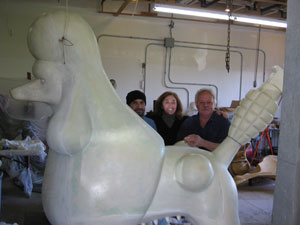
Without the help of sculptor and close friend Dottie Richolson, the original
sculpture would not be what it is and making it would not have been as much
fun.
In addition to Dottie Richolson, the following people were
involved with the mold-making project:
Chris Goodner: Master mold-maker and problem-solver
Jose V. Garcia: Assistant
It was intense and arduous work over a five month period, but their professionalism
and enthusiasm gave every day a wonderful feeling of accomplishment.
I am very grateful to the video artist Liz Magic Laser for the direction and
production of Untitled.
Diane Evans, Director of the Sonoma County Museum was the
impetus for the second casting and I am proud it will be exhibited at the museum during
the summer of 2011.
Without the encouragement of Norman and Norah Stone, this project would never
have begun.
I cannot thank them enough.
Pat Lenz
2008 - 2009
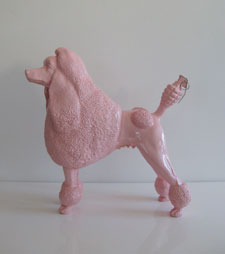
The Model
The project began in 2008 with a maquette.
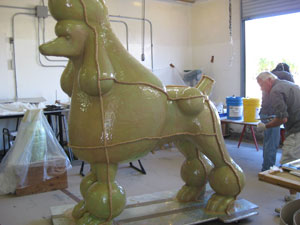
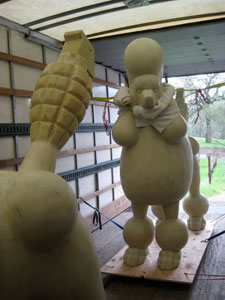
The Original
The original was made
from large (4' X 4' X 8') Styrofoam blocks glued together.
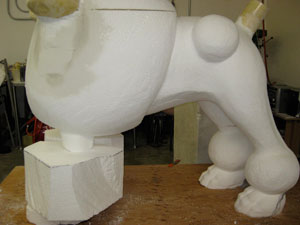
They were then shaped and covered with
fiberglass impregnated with epoxy resin.
Over a period of a few months ,more thickened resin was added to correct
any imperfections and create a perfect surface.
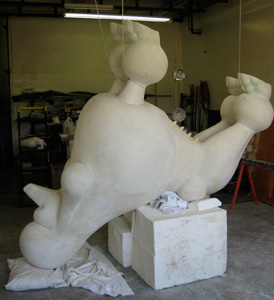
Once this was achieved, the
original was ready to be used as a plug for the mold.
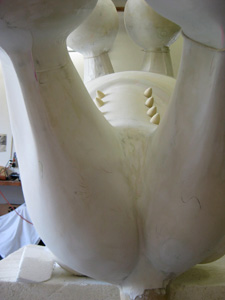
I am grateful to Jonathan Taylor for his help fabricating the stainless steel
elements for the original grenade-atomizer.
Because of his expertise, they fit perfectly.
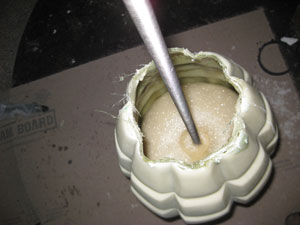
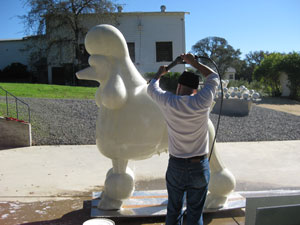
The Mold
Chris arrived @ 10:00. We discovered the PVA was bad (like jello) I drove to Tap Plastic & got a new gallon.
Chris made an insert of aluminum flashing to go between the front legs.
Sprayed original poodle sculpture as well as the grenade
Stopped @ 2:30

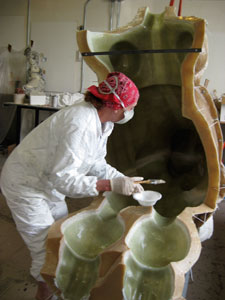
Day 2 - Tuesday, October 12, 2010
Chris arrived around 9:30
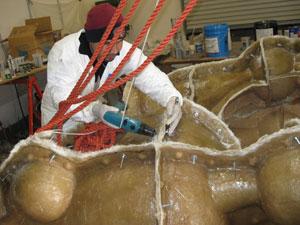
Sprayed poodle with Stoner mold release
Applied urethane rubber thickened with cabosil almost 3 coats
Dottie came for lunch and helped
Stopped around 2:30
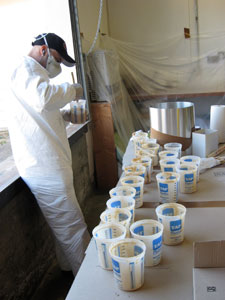
Jose
worked all day. mixed & mixed. a lot of work.
Day 3 - Wednesday, October 13, 2010
Jose cleaned all the measuring containers and cut the flashing for the parting lines.
Chris arrived around 9:30
We marked the dividing lines on the poodle with black marker
We managed to assemble enough empty caulking tubes for the parting lines.
Dottie arrived around 10:30
Made a very stiff mixture of rubber & cabosil and ran a double bead along the seams.
Stopped around 2:30
Day 4 - Thursday, October 14, 2010
Everyone here @ 9:30
Cut parting lines
Inserted metal flashing
Taped & Trimmed flashing
Mixed thinner batches of rubber (1 scoop cabosil) to coat parting lines and adhere flashing to mold.
Re coat entire poodle with more rubber (3 scoops cabosil)
Ran out of rubber material. Jose drove to Douglas & Sturgess to get more.
Ended around 3:30 (Jose not back
yet.)
![]()
Day 5 - Friday, October 15, 2010
Started around 9:30 Chris, Jose, Pat
Added more layers of rubber to the mold, concentrating on the shim lines.
Dottie arrived around 10:30
Chris added dollops (registering keys) of thickened material with the caulking gun.
Dottie & I done around 11:45
Chris finished
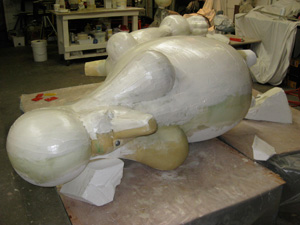
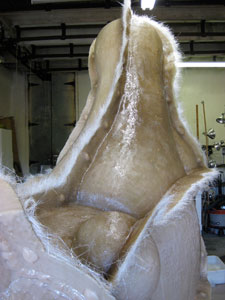
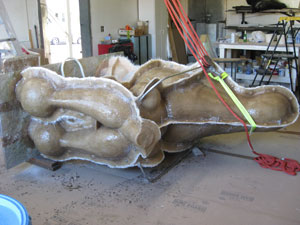
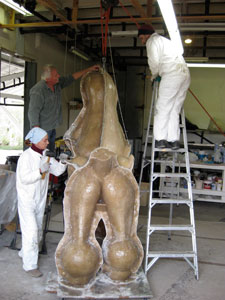
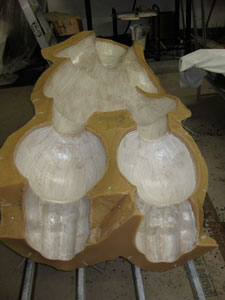
The Mother Mold
Day 6 - Monday, October 18, 2010
Chris, Jose & Pat Started @ 9:30
Put another layer of rubber on the underneath to keep it workable.
Chris made a mixture of resin & chopped fiber & filled in the uneven areas
Went over rubber with mold soap (as a release)
Three layers of polyester resin & fiberglass cloth
Did as much as we could. Jose
stopped @ 4 Chris & me @ 5
Day 7 - Tuesday, October 19, 2010
Pat & Jose started @ 8:00. Chris @ 9:30
Put 3 coats of glass with polyester resin.
Got most of the top of the poodle glassed with the exception of the very top of head and the lower front legs.
Put conduit bars on either side to enable us to put her on her side tomorrow.
Jose worked until 5. Chris & Pat
until 5:30
Day 8 - Wednesday, October 20, 2010
Pat & Jose started at 8. Cleaned mixing cups, bolted poodle to base, tore more cloth, trimmed edges.
Chris came @ 9:30. We put bolts in some of the edges of the mother-mold.
Rigged hoist and lowed poodle on her side.
Only room for one person to work so Chris did the shims on the underside of the poodle, very difficult. Then he taped them & put on a layer of rubber.
Pat finished the mother-mold on the lower front. Nothing else to do.
Chris left @ 3:30
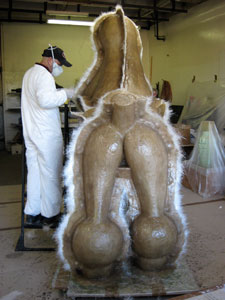
Day 9- Thursday, October 21, 2010
Pat & Jose start @ 8. Put coat of rubber on bottom underside & legs of poodle while she is still on her side. Jose gets into the space between the legs & Pat mixes rubber.
Pat builds a wall of clay on the middle of the nose & does 3 layers of resin & cloth.
Put on mold button keys.
Trim some edges with sawz-all
Put in a few more bolts.
Chris came around 12:30. We have to remove a few buttons that are on the wrong part of the mold. Not hard.
Chris goes over the thin parts & some undercuts with a thick rubber mixture.
We lift the mold with the hoist, turn it around so the head is pointing in the opposite direction. Can now work on the other side.
Chris puts in the shims. Left @ 4:00
Day 10 -Friday, October 22, 2010
Pat & Jose start @ 8. Put rubber on mid-section & build second part of clay wall on face. Put glass on it.
Chris comes @ 9:30. Puts shims on inside of balls, more rubber
We turn poodle over
Put final layer of rubber on mid-section, key buttons mold soap, resin & fiber mixture. Glass this section
Glass half of the top of the head
Chris makes a plywood shim for the two balls to further divide the mold
Glass the lower legs
Chris leaves around 3:00
![]()
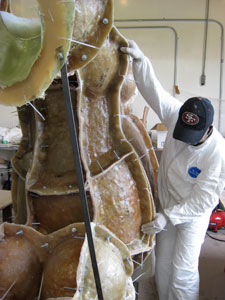
Day 11 Monday, October 25, 2010
Jose 8 to 9:30 to 10:00 to 5. Cleaned containers, tore more glass (all the roll of light-weight mat)
Pat @ 9:30
Chris & Jose drilled holes & bolted mold
Chris finished small section of flange on leg that was hard to reach
Turned poodle on nose (hoist held her off the ground)
Chris poured rubber into recession between front legs to make a plug
Chris made shims for the other balls (used old plywood from other side)
Jose & Pat put rubber on grenade after filling small cracks between wood top & grenade body with clay. Let set. Chris put on parting line & left early (1:30 or 2 ?)
Pat & Jose worked on mother
mold. Finished head, worked on sides &leg but have
to use a heavier weight cloth which is all I have left.
Going through material like crazy. Used up the 2
gallons of bonding resin that Chris bought @ Friedman Brothers.
Put on second coat of rubber on
grenade.
Day 12 Tuesday, October 26, 2010
Jose & Pat start @ 8
Clean containers, trim mold with sawz-all & sand edges tear more glass fabric.
Chris arrives around 10 with 2 more gallons of resin
We turn poodle so Jose can get to difficult parts around the inner lower legs
Chris puts shims on grenade and
leaves around 12
Jose finishes the mold (Jose & Pat manage to flip poodle twice)
& Pat puts 3 more coats of rubber on grenade.
Jose is finished @ 4
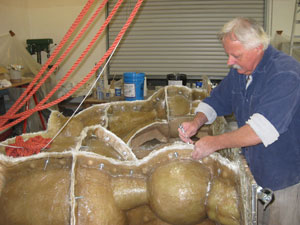
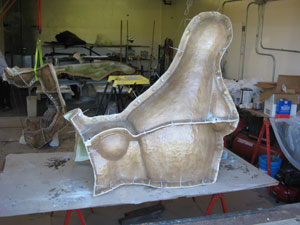
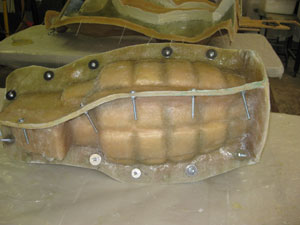
Mother mold
of poodle is done!
Day 13 Wednesday, October 27, 2010 Mold Removal
Jose
& Pat start @ 8. Put in bolts & sawz-all
edges. Clean up
Chris @ 9:30 Starts the mold removal
Pat
puts last coat of rubber on grenade
We spent the entire day removing
mother mold. Not easy. Used chisels & mallets to separate the glass from
the rubber. Drilled small holes in the glass & forced air
in with compressor.
Used hoist on some part to let the weight of the
poodle pull off parts of the mold. The hardest parts to remove were the top
front of the head and the back end.
We cut through the rubber plug in the back
to give it wiggle-room & it finally came off.
Chris started cutting off the rubber of the front section and it came off beautifully. The original poodle looks like it is in great shape so far.
Removing shims so Chris can continue cutting away the rubber tomorrow.
A long hard day but everything worked out well.
Chris & Jose & Pat stopped
@ 4
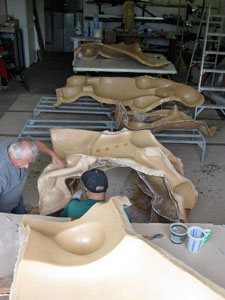
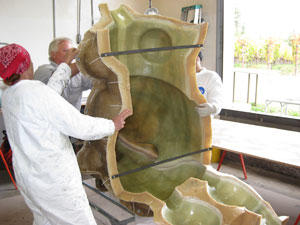
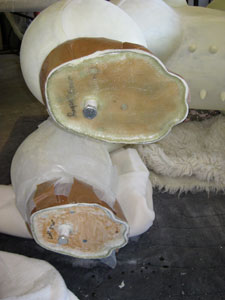
The First Cast
Day 14 Thursday, October 28, 2010
Jose & Pat start at 8. Remove rest of shims and clean studio to get ready to lay out mold parts.
Chris arrives at 9:00. Trims the rubber & removes the piece one by one.
Jose hoses the inside of the rubber to remove the mold release.
Dottie comes around 9:30. She & Pat set up tables for mold pieces.
The day is spent putting the rubber into the mold pieces.
The hardest is the underside.
Day 15 Friday, October 29, 2010
Miserable weather. Dottie & Pat & Jose start @ 8
Spray PVA mold release on one side. Does not go on well.
Chris comes around 9:00.
Attaches rubber to mold with ties
Spray on 2300 release (means we will have to sand)
Put on first coat. Does not dry. All stand around trying hair dryers.
Put on second (Sanding coat) coat
Chris leaves early
Dottie & Pat put on four coats of glass on two side pieces. It takes until 7:00
Exhausted
Day 16 & 17, October 30 & 31, 2010 (No Chris or
Jose)
Pat works alone except for Saturday when Dottie comes from hotel for lunch
Pat goes to Tap plastic. Gets Fast resin
Finishes back & puts two coats of sanding layer on front piece over the weekend.
Takes until 7:00 on Sunday.
Day 18 Monday, November 1, 2010
Pat & Jose start @ 8. Beautiful, warm weather
Jose cuts fabric while Pat puts another sanding layer on back
Chris arrives @ 9:30. Hoist up bottom mold so it is suspended from ceiling.
Puts brace on bottom mold
Chris starts mother mold for grenade. Build sections of plywood
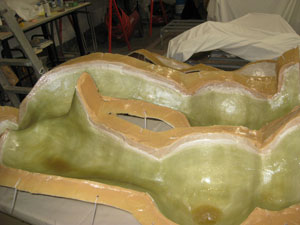
Pat & Jose put first resin
layer on half of bottom mold. Fast resin works very well. No Q-Cell in first
layer only cabosil.
Day 19 Tuesday, November 2, 2010
Pat & Jose start at 8. Put last sanding coat on front part of bottom mold
Start sanding edges of 2 top molds to prepare for joining them
Chris arrives @ 9:30. Works on grenade mother mold
Pat & Jose take sides outside to blow off residue with air compressor.
Wipe off with wet cloth. Let dry
Put four layers of cloth on front part of bottom mold.
Tilt bottom mold so we can glass the top easily.
Chris and Jose put two tops and sides of mold together to see how they fit.
Chris makes a brace for two top
pieces so they do not warp. Then they are inverted so we can work on them. First a sanding
coat.
Chris finishes grenade mother mold & leaves around 2:00
Pat & Jose put 4 layers of glass on top (first fill the teats with resin & chopped fiber).
Pat & Jose put 4 layers of 6inch tape to join two top molds. Then we put the sanding layer on the back of the bottom mold.
Jose & Pat finish at 3:00
Very exciting to see mold beginning to get assembled.
Good day. Great warm, sunny weather
made everything go smoothly.
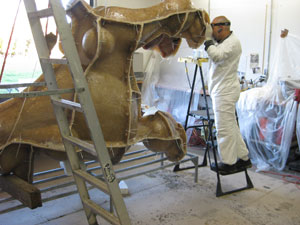
Day 20-Wednesday, November 3, 2010
Jose & Pat start @ 8 :00. Sand edges of front mold
Reposition bottom mold to finish glass
Dottie comes @ 9
Chris arrives @ 9:30
Get everything ready to attach front to sides. Put front on low metal table. Hold in place with hoist.
Place top & sides on top. Fits beautifully.
Chris puts brace across back to keep from distorting. Jockey into place with screw driver through bolt holes. Bolt together.
Pat climbs in to put sanding coat on. Puts on fast drying resin & 4 coats of fiber on part where it is braced so we can finish glassing top.
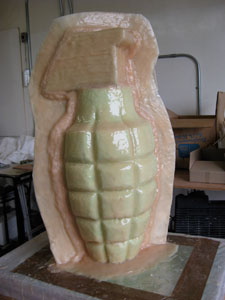
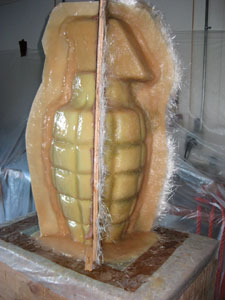
Chris unmolds grenade, cuts rubber. Mold ready.
Chris leaves @ 12.
Jose climbs in & glasses the top & sides together with 4 layers. Pat assists.
Dottie puts first coat on grenade & plywood disk in top of tail.
Dottie, Pat Jose work on final 4 layers of glass on bottom mold. Reinforce feet & legs.
Jose leaves to go to hotel @ 3:30
Dottie & Pat put sanding coat on grenade.
Dottie
& Pat quit @ 4:30
Day 21 Thursday, November 4, 2010
Pat & Jose start @ 8:00 Put third sanding coat on grenade. Sand edge of bottom mold
Dottie arrives @ 9
Chris comes @ 9:30
Trims feet. He and Jose position bottom mold on top (poodle is upside down) bolt in place. Almost perfect.
Jose puts on sanding layer then 4 layers of tape on sides & one side of each leg (will finish other side tomorrow)
Pat & Dottie lay up grenade. Put wood reinforcement on top. Put wood in tail.
Pat leaves @ 2:
Dottie & Jose leave @ 3
Tomorrow Pat & Chris and Dottie
will not be here. Jose will hold down the fort.
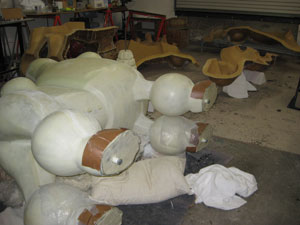
Week Five
Day 22 Monday, November 8, 2010
Jose works all day: Pat assists & works on grenade
Jose sands back mold. Cleans edges with the drill Chris brought.
Chris comes at 9:30: Brings abs tubing & set up for feet (flange & bolts)
Makes template of rear feet & Jose cuts out plywood foot bottoms
Chris & Jose assemble back mold on to the poodle. It is the final piece. Fits well.
Chris leaves before 12
Peter gets more resin at Tap plastic
Jose lays up seam line of back mold. He uses a brush on long stick & one on bent pipe. Not easy, but he does it.
Pat puts 2 sanding coats on grenade
Finish @ 4
Day 23 Tuesday, November 9, 2010
Pat & Jose start @ 8
Put glass on one side of grenade
Prepare studio for unmolding of poodle
Chris comes @ 9:30.
We unmold poodle.
It
goes beautifully. Wonderful surface. Only one piece under the belly is hard to
remove but it finally comes off.
Leave poodle on its face and leave
the front mold in place.
Jose & Pat assemble mold & rubber for next casting
Chris works on foot support in all four legs. Cuts plywood for bottom of back feet.
Chris leaves @ 2:00
Jose finishes other side of grenade & Pat fairs & puts veiling on open section near the crotch of the poodle and on tail (only 2 parts that could not be reached to get glassed).
Pat & Jose reinforce the ABS
for the feet with chopped fiber & glass.
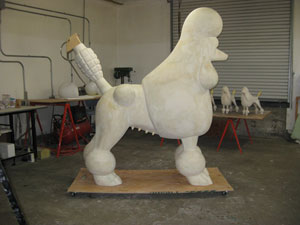
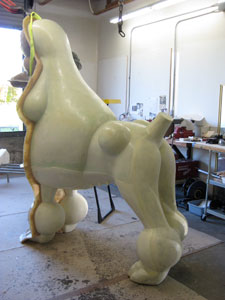
Day 24 Wednesday November 10
Chris & Jose make inserts for feet. Make plywood pieces that fit over flange.
Stand poodle up on level ground to find the high spots.
Grind off excess fiberglass so poodle is level & balanced
Add
foam to grenade & tail
Pat
& Jose glass the bottom of feet & bottom of grenade
Day 25 Thursday November 11
No Chris
Jose & Pat put sanding coat on
bottom of feet & grenade. Begin sanding seams.
Day 26 Friday November 12
Last
day for Chris: 9:30 to 12
Added some more foam to the top of the grenade
Sanded feet
Drilled hole in grenade & tail
Jose works on sanding seams
Almost ready to pressure wash on
Monday!
The next few weeks are spent making the second cast exactly as we did the first.
Went to NY before Xmas but have been working on fairing both casts both before and after.
It is a slow process with only a small amount of work done each day.
Jose put in the leg supports in Cast
number 2
 .
.
Both casts are sanded to 600 grit except for the parts we are still finishing.
Cast a third grenade for the
original poodle. Had trouble with the rubber which is getting dry (it is Tap
Plastic rubber which is not as good as the Douglas & Sturgess
rubber)
Have
to spray it with the
other mold release which is much oilier (but needs to be sanded
& scrubbed before painting) and store it.
When ready to use again, spray
it with the other release.
Today Chris came & put aluminum
pads on the feet of the first casting. (We will do cast number two tomorrow)
and also sand the edges so it is seamless.
Month of January
Spent fairing, attaching three grenades
(cast a third for the original poodle & adding aluminum pads to the feet
of the original / artist proof.
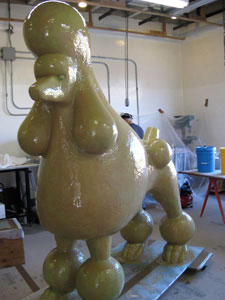
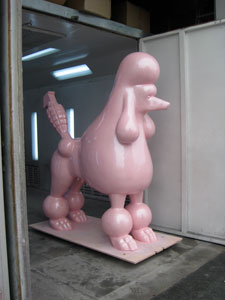
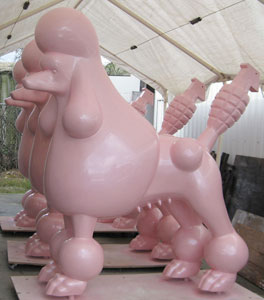
Picked color. I had a lot of trouble with Hawley Paints and
that added at least an extra week to the project. Ken Roux finally did a sample on one
of the small poodles.
I chose a more vibrant pink because I think the piece can
handle the drama.
Monday, February 7, 2011
Preparing to take first poodle
(cast number 2) to the painter tomorrow. Renting U-Haul truck this afternoon.
Getting plywood platform ready & cutting bolts.
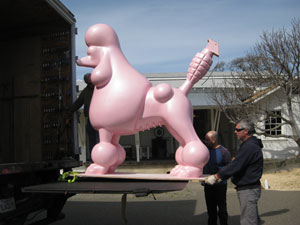
Tuesday, February 8, 2011
Had a very hard time getting poodle
into a 14 foot U-Haul. Finally had to put her on her side & slide her in
sideways.
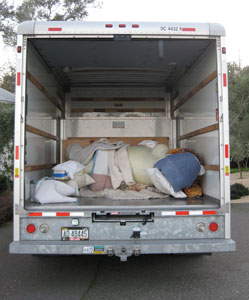
I thought she was well padded but there was a strip of metal on the floor that
scratched her a bit. Easily fixed but will need a much bigger truck.
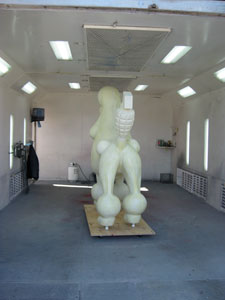
Got her to
the painter and put risers under her feet so the he could spray under them.
She is on a plywood platform on wheels.
Friday, February 11, 2011
Drove up to Cloverdale to check the
color. It is perfect with lots of opalescence.
Got everything ready to move the
next 2 poodles on Monday. Put them on plywood platforms and made sure we had
all the right hardware.
Drove to Santa Rosa and rented a 24 foot Penske with an 8 foot
door and a hydraulic lift for Monday.
Monday, February 14, 2011
Pouring, but Peter went to Santa
Rosa at 7:30 and got the truck. It
is huge, 24 feet with a hydraulic lift and 10 foot door.
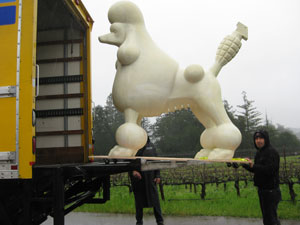
Loaded up the two
poodles (almost took out the fig tree!) and our gear and got to Cloverdale by
10:30.
Unloaded the 2 poodles, put risers on their feet but could not take the
finished poodle back.
There is a mark on the chest that has to be re-sprayed so
we will get all three at the same time. Exhausted from nerves!
Wednesday, March 9, 2011
Jose picked up the 24 foot Penske
truck in Santa Rosa @ 7:45 and we rendezvoused at the painter at 8:15.
He and I loaded
the three poodles onto the truck drove back to the slaughterhouse, got them up
the stairs and into the building and were finished by 12:30.
What a relief!
We
put all the hardware on the poodle that is going to San Francisco and it fits
beautifully. We also tested the stainless threaded rods in the feet and theyare
fine.
Everything is ready for the art movers on Friday morning.
Friday, March 11, 2011
The movers arrive from San Francisco
and load the finished sculpture onto their truck.
She will stay in their warehouse until Monday morning.
Monday, March 14, 2011
Because of the complexities of the location, it takes the entire day to install
the sculpture.
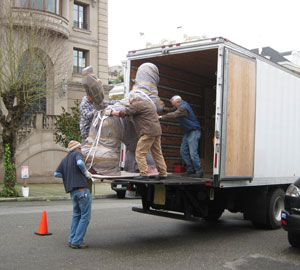
It takes four men, three trucks, a forklift ,a crane, and a hoist.
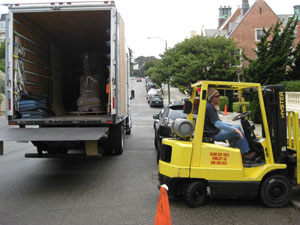
Getting her down to the garden is very dramatic.
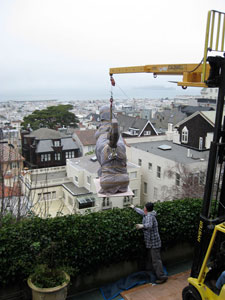
Once the perfect position is choosen, she is bolted to the cement patio.
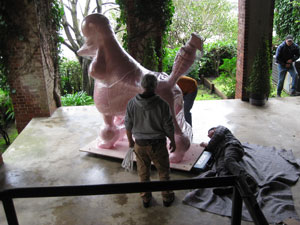
The installation is finished and she is in her new home.
The second casting will be exhibited at the Sonoma County Museum for the summer
of 2011.
during the summer of 2011.